MiOS API Basics
The MiOS API is what your plugin will use to interface with the hub, and implement its functionalities. Among a host of other features, the API makes available a full suite of modules, which your plugin may `require` directly into the code, giving you access to services like:
UDP/TCP connections – https://developer.mios.com/api/scripting/modules/network/
Bluetooth – https://developer.mios.com/api/scripting/modules/bluetooth/
HTTP – https://developer.mios.com/api/scripting/modules/http/
Zwave – https://developer.mios.com/api/scripting/modules/zwave/
Zigbee – https://developer.mios.com/api/scripting/modules/zigbee/
…and many others.
Perhaps most importantly, it allows you to interface with the ezlogic platform using the ‘Core’ module:
Core – https://developer.mios.com/api/scripting/modules/core/
The core module enables you to create and access devices, items, settings, UI messages, etc.
Almost no plugin will (or should) use all of the modules available, instead only using the ones that are necessary for providing the desired functionality. However, some pieces of the API are so central, that you’ll almost certainly use them, or benefit from knowing them. In this section, we’ll give them some light.
Note that we’ll only discuss some parts of the modules. Your ultimate reference should be the official MiOS API documentation at https://developer.mios.com/api/, especially the modules section – https://developer.mios.com/api/scripting/modules/. When in doubt, please refer to it.
All of the code snippets present in this section will also be present in the minimal example plugin provided. So, feel free to explore there as well. Let’s start.
There are 3 levels of storage: Local, Global, and Persistent.
Local – Any `local` variable will only be accessible to that script, and to its appropriate scope.
Global – Any global variable will be accessible to \textit{all} of the plugin’s scripts. This is important, as it allows different scripts to communicate/share data.
Persistent – Any variable stored with the storage api module will be stored persistently. These are accessible by any script and will survive shutdowns, reboots, power outages, etc.
					```lua

-- Importing storage module.

local storage = require("storage")

-- Local variables.

local num_0 = 1
local str_0 = "abc"
local tab_0 = {1, 3, 5}

-- Global variables.

num_1 = 2
str_1 = "def"
_G.tab_1 = {2, 4, 6} -- Alternative way to express it

-- Persistent variables (storing).

storage.set_number("num_2", 3)
storage.set_string("str_2", "ghi")
storage.set_table("tab_2", {3, 5, 7})

-- Persistent variables (retrieving).

local num_2 = storage.get_number("num_2")
local str_2 = storage.get_string("str_2")
local tab_2 = storage.get_table("tab_2")
```
Higher levels of storage are less efficient, so try to use the lowest storage level you need. If there’s no reason for something to be persistent, make it global. If there’s no reason for something to be global, make it local.
You can log data using the logging module. There are different levels of logging, such as `info`, `debug`, and `error`. You can see the full list in the documentation at https://developer.mios.com/api/scripting/modules/logging/module-api-require-logging/.
These different levels are useful for different purposes. For example, `debug` logs will not be generated for end users, so they may be more extensive, and be used more frequently, without affecting the end-user’s storage space.
					```lua
-- Importing logging module.

local logging = require("logging")

-- Examples of logging.

logging.info("3 devices added.")
logging.error("Could not create connection")
local t = {1, 'abc'}
logging.debug(t)

```
The logs are written to ‘`/var/log/firmware/ha-luad.log`’ inside the hub[^4]. So, to access them, you need to get into the hub. How you’ll do that depends on the type of hub you’re using:
[^4]: It’s worth noting that there are a lot more log files inside the `firmware` folder. `ha-luad.log` is simply the one generated by plugins. These other log files contain useful information about different aspects of the hub.
- Physical hub – ssh into it (i.e. `ssh mypc@106.000.0.1`).
- Virtual hub – docker exec bash into it (i.e. `sudo docker exec -it vhub_beta bash`).
Once you’re in, you can visualize the logs however you wish. For example, with tail: `tail -f -n 50 /var/log/firmware/ha-luad.log`.
					```
	**** luad Restarted at Fri Sep 23 15:20:45 UTC 2022


	2022-09-23 15:20:45 INFO  : Logs folder was changed: //var/log/firmware
	2022-09-23 15:20:45 INFO  : addon.lua: - [2022-08-10T20:49:14+0000]
	2022-09-23 15:20:45 INFO  : addon.lua: Spread: connected to "4803" with private group "#addon.lua#localhost"
```
A lot of the API is based upon asynchronous execution. This means that individual scripts can be called to be executed by asynchronous events, such as a network input, http response, or in a specific timer set by you.
The two common ways to interact are either by subscribing to an event, which will execute the script, or by manually scheduling the execution of a script. Let’s see an example of each:
The [network](https://developer.mios.com/api/scripting/modules/network/) package handles transport-layer connections, such as UDP and TCP. When using a persistent TCP connection, you can send or receive data from these connections. To be sure that your handler script will execute to process that data, you may `subscribe` the script to that connection:
					```lua
local network = require("network")

-- The file 'network_handler.lua' will now be called on every network event.

network.subscribe("HUB:ezlo.minimal/scripts/network_handler")

-- We then attempt a connection.
network.connect{
	ip = '127.0.0.1',
	port = '5000',
	connection_type = 'TCP',
}
-- This connection attempt will queue the execution of 'network_handler.lua'.

```
Note that the queued script will get some data about the event that triggered it. This data can be accessed through the scripts' `...` arguments:

```lua
local logging = require("logging")

-- This is getting the arguments, which will include the event's data.
local args = …

-- Logging event's data.
logging.debug(args)

```
The timer module (https://developer.mios.com/api/scripting/modules/timer/) is how your plugin can manually schedule a script to execute:
					```lua

-- Importing timer module.
local timer = require("timer")

-- Immediately queues 'script_0.lua' to be executed:

timer.set_timeout(0, "HUB:ezlo.minimal/scripts/script_0")

-- Queues 'script_1.lua' to be executed in 5 seconds:


timer.set_timeout(5000, "HUB:ezlo.minimal/scripts/script_1")

-- Queues 'script_2.lua' to be executed every 5 seconds:


timer.set_interval(5000, "HUB:ezlo.minimal/scripts/script_2")

```
One important point to emphasize is that the asynchronous system operates in a queue fashion, with new scripts added to the end of the queue. One will finish, before the next executes. There are two major consequences of this:
- The system is not multithreaded. So despite its asynchronous nature, data races are not a concern, as no two scripts will execute in parallel.
- If one script falls into an infinite or particularly long execution loop, the whole plugin halts, since all other queued scripts must wait for the current one to finish before executing. So it may be a good idea to avoid overly long execution times in one script.
Devices are a representation of an entity that acts or can be acted upon by automation. It may be a ‘model’ for a physical device, such as a light bulb, switch, or sensor. It might also be a purely virtual one, like a client that communicates to a server. Devices can be created, accessed, and modified using the core module:
					```lua
local core = require("core")

-- Creating a new device.

local device_id = core.add_device{
	type = 'device',
	device_type_id = 'api_communication',
	category = 'generic_io',
	subcategory = 'generic_io',
	battery_powered = false,
	gateway_id = core.get_gateway().id,
	-- This name will be displayed in the UI.
	name = "API Communication Client",
}
-- ...
```
There are two major parts of the device that interface with the user: Settings and Items.
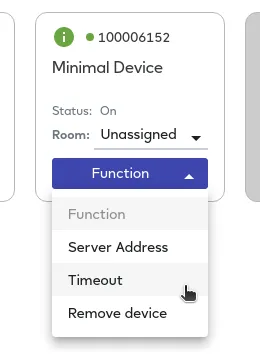
Settings are information about the device that are available to the user through the UI to configure. They may be modifiable, and may be used to affect the workings of the device. For example, if the device represents a persistent connection to a server, some possible settings are the IP address of the server, and the acceptable timeout period.
					```lua
-- …

-- Create an 'id' setting to the device created:

local address_setting_id = core.add_setting{
	device_id = device_id,
	label = {
		text = 'Server Address'
	},
	description = {
		text = "e.g. "127.0.0.1''
	},
	value_type = "string",
	value = '127.0.0.1',
	status = "synced",
	has_setter = false,
}

local timeout_setting_id = core.add_setting{
	device_id = device_id,
	label = {
		text = "Timeout"
	},
	description = {
		text = "The maximum amount of time to wait for a response before trying again (in seconds)"
	},
	value_type = "int",
	value = 10,
	status = "synced",
	has_setter = true,
}
-- ...
```
Most notably:
- device_id: The id of the target device.
- label.text: The name that is presented to the user.
- description.text: The description presented to the user.
- value_type: The type of the setting.
- value: Starting value for the setting.
- has_setter: Whether the user can modify the value of the setting in the UI (otherwise, it can only be modified internally by the plugin):
The MeshBot Automation system is what allows users to automate their devices, giving them control of their lights, sensors, as well as their virtual devices, created by the plugins they have installed. In this subsection, we’ll take a deeper look at that last category.
As an example, here’s a MeshBot Automation that enables motion detection in a room if the user turns on a virtual switch:
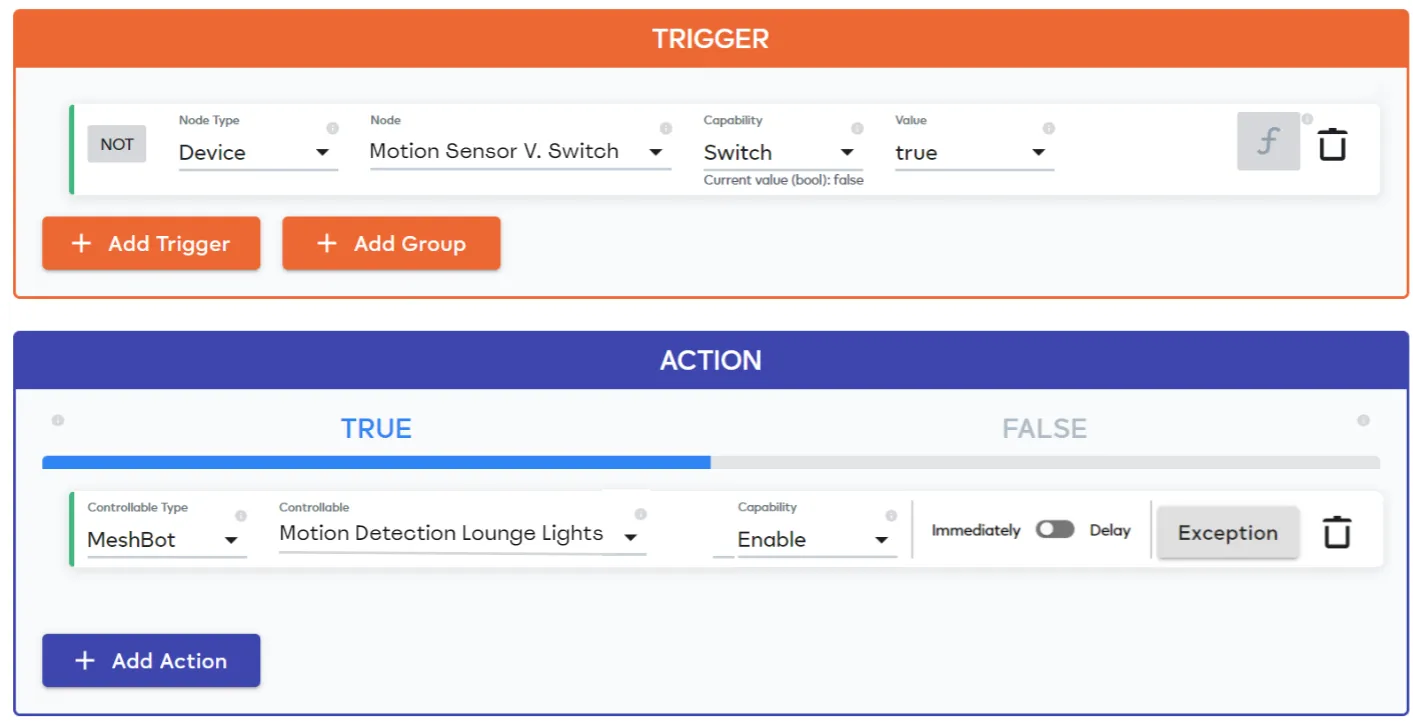
MeshBot Automations are divided into Triggers and Actions. Triggers are the conditions to trigger the automation to execute. Actions are the actions performed when the automation is executed. When the Triggers in an automation are satisfied, the Actions are executed.
Items are the way that developers can expose the Triggers/Actions of your plugin, and as such, your plugin’s capabilities in the automation system.
- ‘Getter’ items are considered Triggers (as the API “gets” their values, to decide when the Trigger is set).
- ‘Setter’ items are considered Actions (as the API “sets” their values when the Action is performed).
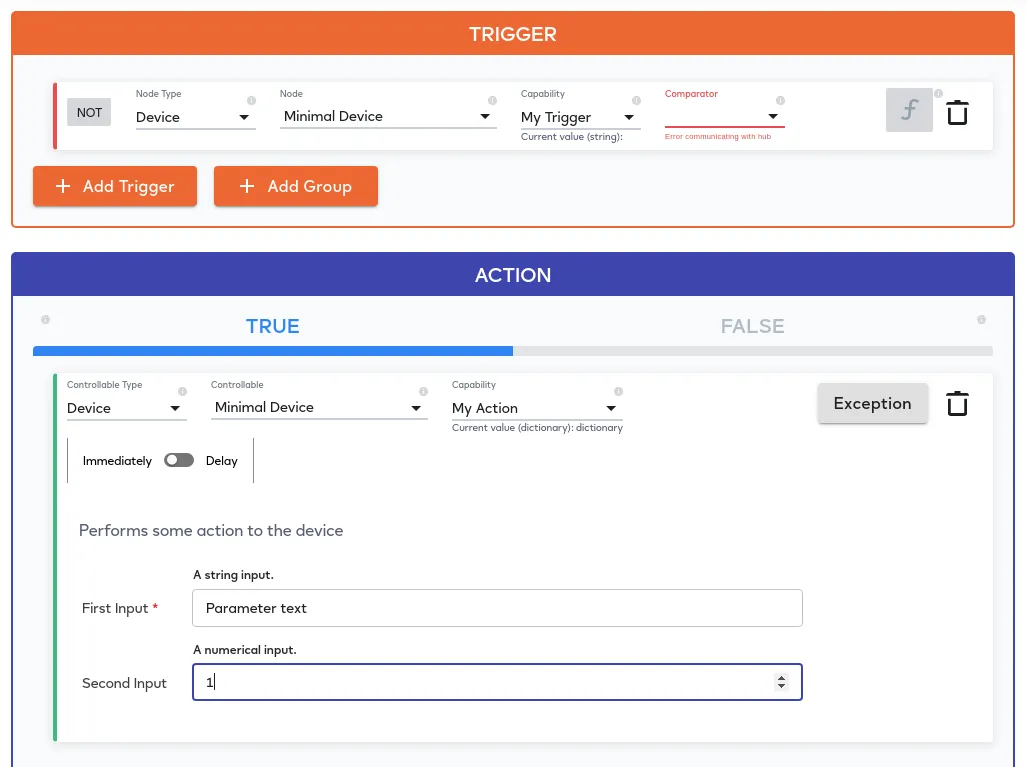
We’ll now see an example of creating two items, the first one being a trigger, and the second one being an action (take note of the `has_getter` and `has_setter` attributes):
					```lua
-- …

local my_trigger = core.add_item{
	device_id = device_id,
	name = 'My Trigger',
	has_getter = true,
	has_setter = false,
	show = true,
	value_type = 'string',
	value = '',
}

local my_action = core.add_item{
	device_id = device_id,
	name = 'My Action',
	has_getter = false,
	has_setter = true,
	show = true,
	value_type = 'dictionary.string',
	value = {},
}
```
There’s an additional step to the setter item (the action): Setting its interface. This is done in the `interface.json` file. This is the specification used for this item:
					```json
	...
	{
		"id": "my_action_id",
		"ui": {
			"name": "plugin call",
			"description": "Performs some action to the device",
			"placement": "plugin"
		},
		"type": "setter-api",
		"apply": [
			{
				"element": "item",
				"when": {
					"property": "name",
					"operator": "=",
					"value": "My Action"
				},
				"to_api": "hub.item.value.set"
			}
		],
		"inputs":[
			{
				"name":"First Input",
				"type": "string",
				"required": true,
				"description": "A string input."
			},
			{
				"name":"Second Input",
				"type": "number",
				"required": false,
				"description": "A numerical input."
			}
		]
	},
	...
```
Take note of the property, where we specify ““. This specifies the item we just created. Together with ““, this means that it’ll change the item’s value to the upon triggering the action.
You can see the resulting format of the items in the MeshBot Automations tab:
However, more important than changing the item value, is the fact that the script specified in the `config.json` (refer to that section again if necessary) will be executed with this. That is the place where the logic of your action can go:
					```lua
local logging = require("logging")


-- The new values for the item are in the 'value' field of the arguments.


local args = ...
local value = args.value


-- Retrieving the values of the inputs.


local input_string = value["First Input"] or ''
local input_numerical = value["Second Input"] or 0
logging.debug("First Input: "..input_string)
logging.debug("Second Input: "..tostring(input_numerical))

-- Perform some userful action here.
```
This script will be triggered every time the Action is executed by the automation. This way, your plugin can respond to the actions accordingly, and thus be ready for use in Ezlo’s MeshBot Automation System.